
Self-Hosting Listmonk: A Newsletter and Mailing List Manager That Respects Your Budget
Newsletter platforms have a pricing problem. Mailchimp charges per subscriber. ConvertKit charges per subscriber. Buttondown charges per subscriber. At 10,000 subscribers, you're paying $80-150/month for the privilege of sending emails — emails that cost fractions of a cent each to actually deliver.
Listmonk is a self-hosted newsletter and mailing list manager that eliminates the per-subscriber tax. It's a single Go binary backed by PostgreSQL, and it handles everything: subscriber management, campaign creation, templating, analytics, bounce processing, and list segmentation. You pay for SMTP delivery (Amazon SES charges $0.10 per 1,000 emails) and your server. That's it.
Why Listmonk
The self-hosted newsletter space is surprisingly thin. Most options are either abandoned PHP projects from 2012 or overcomplicated enterprise solutions. Listmonk stands out because:
- Single binary — one Go executable, minimal dependencies
- Fast — handles millions of subscribers without breaking a sweat
- Modern UI — clean, responsive web interface
- Template system — Go templates with a visual editor
- Segmentation — lists, tags, and SQL-based subscriber queries
- Analytics — open rates, click tracking, bounce processing
- API-first — full REST API for automation
- Multi-list support — unlimited lists, each with independent settings
- Double opt-in — built-in confirmation workflow
- Import/export — CSV import with field mapping, bulk exports
What Listmonk is not
Listmonk is a mailing list manager, not a marketing automation platform. It doesn't have:
- Visual email builders (drag-and-drop editors like Mailchimp's)
- Advanced automation (multi-step drip campaigns, behavioral triggers)
- Landing page builders
- CRM features
- A/B testing (planned but not yet implemented)
If you need Mailchimp-level marketing automation, Listmonk isn't the right choice. But if you need to send newsletters to a list of subscribers reliably and cheaply, it's excellent.
Cost Comparison
The economics of self-hosted newsletters are compelling:
| Subscribers | Mailchimp | ConvertKit | Listmonk + SES |
|---|---|---|---|
| 1,000 | $30/mo | $29/mo | ~$1/mo |
| 5,000 | $75/mo | $79/mo | ~$2/mo |
| 10,000 | $115/mo | $119/mo | ~$4/mo |
| 50,000 | $350/mo | $379/mo | ~$15/mo |
| 100,000 | $700/mo | Custom | ~$25/mo |
Listmonk costs assume Amazon SES at $0.10/1,000 emails, 4 campaigns/month, plus a $5/mo VPS. Actual costs vary based on sending volume and hosting.
The savings compound quickly. At 50,000 subscribers, you save over $4,000/year. That's real money.
Self-Hosting Listmonk: Setup
Server requirements
Listmonk is remarkably efficient:
- Minimum: 512 MB RAM, 1 CPU core
- Recommended: 1 GB RAM, 2 CPU cores
- Storage: 1 GB + database growth (subscriber data is small)
- Database: PostgreSQL 12+
For reference, Listmonk can manage 1 million subscribers on a $10/month VPS. The bottleneck is almost always your SMTP provider's sending rate, not Listmonk itself.
Docker Compose setup
version: "3.8"

services:
  listmonk:
    container_name: listmonk
    image: listmonk/listmonk:latest
    ports:
      - "9000:9000"
    environment:
      TZ: "America/Los_Angeles"
    volumes:
      - ./config.toml:/listmonk/config.toml
    depends_on:
      database:
        condition: service_healthy
    restart: always
    command: ["./listmonk", "--config", "/listmonk/config.toml"]

  database:
    container_name: listmonk_db
    image: postgres:16-alpine
    environment:
      POSTGRES_USER: listmonk
      POSTGRES_PASSWORD: ${POSTGRES_PASSWORD}
      POSTGRES_DB: listmonk
    volumes:
      - pgdata:/var/lib/postgresql/data
    restart: always
    healthcheck:
      test: ["CMD-SHELL", "pg_isready -U listmonk"]
      interval: 10s
      timeout: 5s
      retries: 5

volumes:
  pgdata:
Create config.toml:
[app]
address = "0.0.0.0:9000"
admin_username = "admin"
admin_password = "your-secure-admin-password"

[db]
host = "database"
port = 5432
user = "listmonk"
password = "your-database-password"
database = "listmonk"
ssl_mode = "disable"
max_open = 25
max_idle = 25
max_lifetime = "300s"
Initialize the database
Before starting Listmonk for the first time, run the database setup:
docker compose run --rm listmonk ./listmonk --install --config /listmonk/config.toml
Then start everything:
docker compose up -d
Access the admin panel at http://your-server:9000. Log in with the credentials from config.toml.
Want more communication guides? Get guides like this in your inbox — Self-Hosted Weekly delivers one free deep-dive every week.
Configuring SMTP
Listmonk needs an SMTP provider to actually send emails. You have several options.
Amazon SES (recommended for volume)
SES is the cheapest option for high-volume sending. After setting up your SES account and verifying your domain:
In the Listmonk admin panel, go to Settings > SMTP and add:
| Setting | Value |
|---|---|
| Host | email-smtp.us-east-1.amazonaws.com |
| Port | 465 |
| Auth protocol | LOGIN |
| Username | Your SES SMTP username |
| Password | Your SES SMTP password |
| TLS | SSL/TLS |
| Max connections | 10 |
| Max message retries | 3 |
| Idle timeout | 15s |
| Wait timeout | 5s |
Fastmail / Mailgun / Postmark
Any SMTP provider works. Postmark and Mailgun are good choices if you want better deliverability tools than SES provides. They cost more ($1-1.50 per 1,000 emails) but include dedicated IPs and reputation monitoring.
Self-hosted SMTP
You can run your own mail server (Stalwart, Postfix, etc.), but email deliverability is hard. Unless you have experience with SPF, DKIM, DMARC, IP warm-up, and feedback loops, use a managed SMTP provider. Your newsletters will land in spam otherwise.
Setting Up Your First Newsletter
1. Configure your domain
Go to Settings > General and set:
- Root URL —
https://newsletter.yourdomain.com - Logo URL — your brand logo
- Favicon URL — browser tab icon
- From email —
[email protected] - Admin notification emails — where to receive bounce alerts
2. Create a mailing list
Go to Lists and create your first list:
- Name: "Weekly Newsletter"
- Type: Public (appears on subscription forms) or Private (admin-managed)
- Opt-in: Double (recommended — sends confirmation email)
- Description: Shown on the subscription page
3. Build a subscription form
Listmonk generates embeddable HTML forms. Go to Lists > Your List > Subscription Form to get the HTML:
<form method="post" action="https://newsletter.yourdomain.com/subscription/form">
    <input type="hidden" name="nonce" />
    <input type="email" name="email" required placeholder="Your email" />
    <input type="hidden" name="l" value="YOUR_LIST_UUID" />
    <button type="submit">Subscribe</button>
</form>
Embed this on your website. Listmonk handles the confirmation email and unsubscribe links automatically.
4. Create an email template
Go to Campaigns > Templates. Listmonk uses Go templates. A basic responsive template:
<!DOCTYPE html>
<html>
<head>
    <meta charset="utf-8">
    <meta name="viewport" content="width=device-width, initial-scale=1">
    <style>
        body { font-family: -apple-system, sans-serif; max-width: 600px; margin: 0 auto; padding: 20px; }
        .header { border-bottom: 2px solid #333; padding-bottom: 10px; margin-bottom: 20px; }
        .footer { border-top: 1px solid #ccc; padding-top: 10px; margin-top: 20px; font-size: 12px; color: #666; }
    </style>
</head>
<body>
    <div class="header">
        <h1>{{ .Campaign.Name }}</h1>
    </div>

    {{ .Body }}

    <div class="footer">
        <p>You're receiving this because you subscribed to our newsletter.</p>
        <p><a href="{{ .UnsubscribeURL }}">Unsubscribe</a></p>
    </div>
</body>
</html>
5. Send a campaign
Go to Campaigns > New:
- Enter a subject line
- Select the target list(s)
- Write your content (markdown or HTML)
- Preview and test (send a test email to yourself)
- Schedule or send immediately
Listmonk processes the queue and sends emails at your configured rate. You can watch progress in real time on the campaign page.
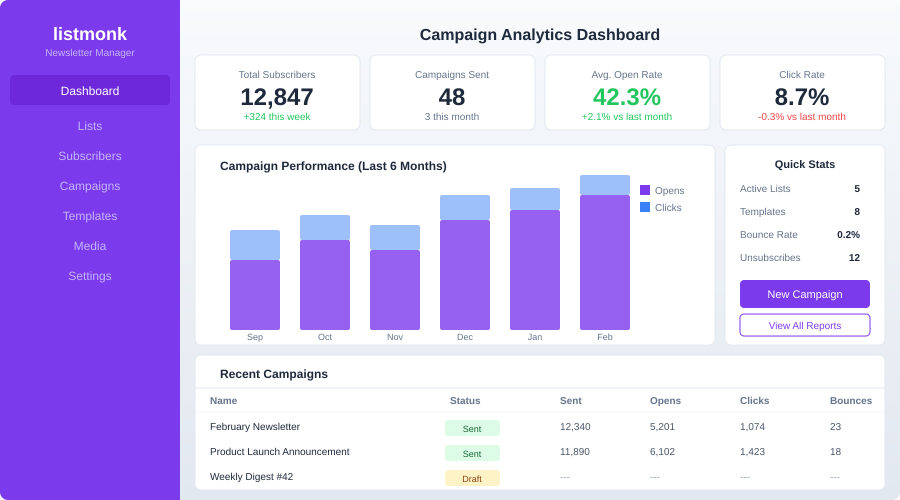
Analytics and Tracking
Listmonk tracks:
- Open rates — via a tracking pixel (can be disabled for privacy)
- Click rates — link click tracking with per-link breakdown
- Bounce rates — hard and soft bounces
- Unsubscribe rates — per campaign and per list
Go to Campaigns > [Your Campaign] to see analytics after sending. Listmonk also provides aggregate statistics across all campaigns.
Bounce processing
Configure bounce processing to automatically handle failed deliveries:
- Hard bounces (invalid address) — subscriber is blocklisted after N bounces
- Soft bounces (mailbox full, temp failure) — retried, then blocklisted if persistent
Set up a bounce mailbox or use SES/Mailgun's bounce webhook to feed bounce data back to Listmonk automatically.
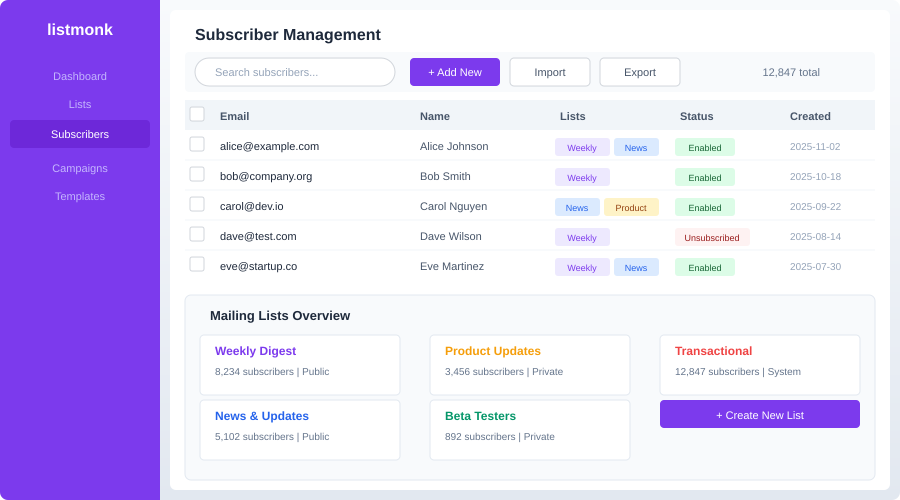
Subscriber Management
Importing subscribers
Listmonk accepts CSV imports with flexible field mapping:
email,name,attributes
[email protected],Alice Smith,"{""plan"": ""pro"", ""signup_date"": ""2024-01-15""}"
[email protected],Bob Jones,"{""plan"": ""free""}"
The attributes column accepts JSON, which you can use for segmentation later.
Segmentation with SQL
Listmonk's killer feature for power users: SQL-based subscriber queries. When creating a campaign, you can target subscribers with raw SQL:
-- Subscribers who signed up in the last 30 days
subscribers.created_at > NOW() - INTERVAL '30 days'

-- Subscribers with a specific attribute
subscribers.attribs->>'plan' = 'pro'

-- Subscribers on list A but not list B
subscribers.id IN (
    SELECT subscriber_id FROM subscriber_lists WHERE list_id = 1
) AND subscribers.id NOT IN (
    SELECT subscriber_id FROM subscriber_lists WHERE list_id = 2
)
This is more powerful than any tag-based segmentation system. If you're comfortable with SQL, you can slice your audience any way you want.
API Integration
Listmonk has a comprehensive REST API. Common use cases:
Add a subscriber programmatically
curl -u admin:password -X POST \
  'https://newsletter.yourdomain.com/api/subscribers' \
  -H 'Content-Type: application/json' \
  -d '{
    "email": "[email protected]",
    "name": "New User",
    "status": "enabled",
    "lists": [1],
    "attribs": {"source": "website-signup"}
  }'
Trigger a transactional email
curl -u admin:password -X POST \
  'https://newsletter.yourdomain.com/api/tx' \
  -H 'Content-Type: application/json' \
  -d '{
    "subscriber_email": "[email protected]",
    "template_id": 2,
    "data": {"order_id": "12345", "item": "Widget Pro"},
    "content_type": "html"
  }'
This makes Listmonk useful beyond newsletters — you can use it for transactional emails (order confirmations, password resets) if you don't want a separate service.
Reverse Proxy Setup
Caddy:
newsletter.yourdomain.com {
    reverse_proxy localhost:9000
}
Nginx:
server {
    server_name newsletter.yourdomain.com;

    location / {
        proxy_pass http://localhost:9000;
        proxy_set_header Host $host;
        proxy_set_header X-Real-IP $remote_addr;
        proxy_set_header X-Forwarded-For $proxy_add_x_forwarded_for;
        proxy_set_header X-Forwarded-Proto $scheme;
    }
}
Backup Strategy
# Database backup (contains all subscribers, campaigns, templates)
docker exec -t listmonk_db pg_dumpall -c -U listmonk > listmonk-backup.sql

# Restore
cat listmonk-backup.sql | docker exec -i listmonk_db psql -U listmonk
The database is the only critical piece. There are no uploaded files to worry about (email images should be hosted externally or inline).
Deliverability Tips
Self-hosting email sending means you're responsible for deliverability. A few essentials:
- Set up SPF, DKIM, and DMARC for your sending domain. Without these, your emails land in spam.
- Warm up your sending IP — start by sending to small batches (100/day) and gradually increase over 2-4 weeks.
- Use double opt-in — this prevents spam complaints and ensures clean lists.
- Include an unsubscribe link — Listmonk does this automatically, but make sure it's visible.
- Monitor bounce rates — if your bounce rate exceeds 5%, SMTP providers will throttle or ban you.
- Don't buy email lists — this should be obvious, but sending to purchased lists will destroy your sender reputation.
- Use a dedicated subdomain — send from
[email protected]rather than[email protected]to isolate your newsletter reputation from your primary domain.
Honest Trade-offs
Listmonk is great if you:
- Want to own your subscriber data
- Send newsletters to 1,000+ subscribers and want to save money
- Are comfortable with basic server administration
- Need SQL-level segmentation power
- Want a clean, no-nonsense newsletter tool
Consider Mailchimp/ConvertKit instead if you:
- Need drag-and-drop email builders
- Want multi-step automation workflows
- Don't want to manage SMTP deliverability
- Need built-in landing pages and forms
- Have a small list (< 1,000) where the free tier of SaaS tools is sufficient
Consider Mailtrain or Mautic instead if you:
- Need marketing automation (drip campaigns, lead scoring)
- Want a visual workflow builder
- Need CRM-like features alongside newsletters
The bottom line: Listmonk is the best self-hosted newsletter tool for people who just want to send emails to a list of subscribers without paying per-subscriber fees. It's lean, fast, and does exactly what it says. If you outgrow Mailchimp's free tier and don't need its marketing automation features, Listmonk pays for itself in the first month.